Work Flow
- Keith Proven

- Jan 29, 2019
- 4 min read
Landscapes / Seascapes
It's taken me a while, but I think I'm developing a bit of a style with my photography. Certainly, in the internal competitions at St Andrews Photographic Society, folk can usually tell which anonymised images are mine! There will have been many things that have contributed to my particular style, though one of the more obvious ones is the frequency with which I don a pair of sunglasses. It probably started because I was afflicted by migraines from a young age and the associated sensitivity to bright light was mitigated a little by sunglasses. Whether or not bright light was actually a trigger is a moot point. The upshot is I tended to see more detail in skies and landscapes than I otherwise would. The number of times I'd say to my wife "Wow! Look at those clouds" and after a cursory glance up she'd give a look of resignation that only 30 odd years of marriage can engender. Of course it isn't helped by an incident in the mid 1980s when, on leaving a party in Portree at silly o'clock in the morning I stopped and proclaimed "@*$$! Look at that cloud!!" to which Jackie sighed, "That's a tree, Keith". It appears she had that resignation thing nailed without all those years of marriage!
Now, even without the shades, I can pick out patterns and depth in clouds (or trees), seas or grasses that others often miss. I then see it as a duty to portray that in my images. Is it creating drama that otherwise doesn't exist? Or is it merely interpreting what I see/feel when viewing a scene? Who knows - it's just the way I do it.
The Raw Process
Firstly, I always shoot RAW files and, for landscapes, always manual. This gives me the maximum flexibility when I come to processing the image. I also seldom bother with either histograms or exposure readings when looking through the viewfinder. I have been using my current cameras for long enough to know how faithfully the Live View is reproduced in the RAW file, so working from the viewfinder / screen works for me. Then, being sure not to overexpose anything (if it looks overexposed it'll be overexposed and totally blown out features cannot be rescued), I take my shot.

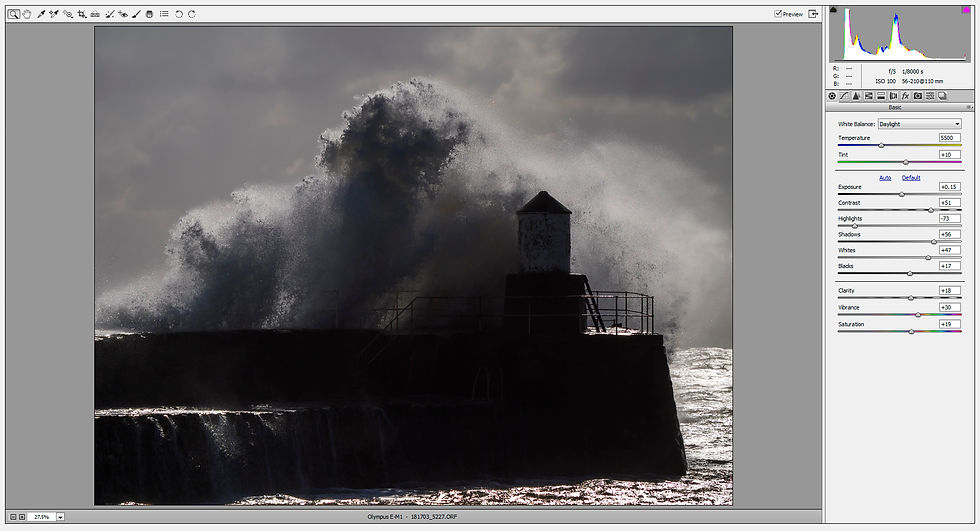
So, something a little tricky here. The old lighthouse at Pittenweem during a storm. Shooting pretty much directly into the sun, avoiding blowout in the water was always going to be a problem. The camera was sat on a tripod, ISO was set at 100, the lowest I can go and exposure was 1/8000s which is the fastest shutter speed. Aperture was f/5 and I was set on 'fast burst', up to 9 frames per second. Focus was fixed on the lighthouse and my finger was poised over the shutter release waiting for the right wave aaaaand... - click.
As is the case for all my photography, back at the computer, the card is downloaded using Adobe Bridge. Usually as the card is downloading I'm looking at the images as they appear and doing a really quick first edit. With a short burst shot of a breaking wave, I'll give things a closer inspection.
On the face of it, a few things are immediately obvious to me with the image above. Firstly it's good and sharp, plenty of detail in the wave and I can see there is plenty of scope to develop the structure of the wave. The overall composition is good, but the pier looks way too dark (I could easily see details while I was standing there) and the menace I felt standing on the middle pier as waves thundered over the outer wall a mere 50 metres away was missing as was any amount of colour.
First Process - Adobe Camera Raw
My first pass process is always in Camera Raw. It allows the file to be opened in Photoshop and the majority of tweaks can be made here before fiddling with it in Photoshop.
This is where shooting RAW and knowing your camera comes in useful. That blacked out pier? Well, I know there'll be plenty of detail still in the file to lift the overall image. So the first thing I do is check the extent of dynamic range by fully lightening shadows and darkening highlights. I can then adjust exposure a little then pull back the shadows and highlights from the extremes to get a basic exposure/dynamic range. I'll also adjust white balance - here I changed it from 'as shot' which was auto white balance to the Adobe Raw 'daylight' preset which added a little warmth. And I upped the vibrancy and saturation a touch...
Still a little dark and lacking detail in the pier and perhaps a little short of the full drama in the sky, I added a couple of graduated filters one from the bottom up to lighten the pier and one from the top to darken and further saturate the sky and sharpen the wave...

A final adjustment in the curves and a touch of darkening vignette and we're ready to open in Photoshop.

Photoshop
This is where I do the fine tuning, add layers and carry out final noise reduction and sharpening. Layers and masks allow for very subtle dodging and burning and structural modelling of the various elements. If I'm being totally honest, a lot of this final work is 'hit or miss' - trying various things and if it doesn't work, dump it. All of it working towards an image I feel represents what I remember when I was taking the image...

So there you have it, a quick trip through how I go from capture to final save of a photo of a wave breaking over a harbour wall. It might not be the best way and it might not be how you'd do it and no doubt I'll change things (well I know I have, as I've added 'Nik Collection' plug-in to my Photoshop processing for noise reduction and sharpening - also sometimes using a mono layer to add further depth/dynamics to an image).


Thanks Kieth, I'm really enjoying the blog. I only took up digital photography seriously 18 months ago and am still trying to settle on a workflow so this is all very useful.